Close your eyes and visualize a cowboy. What do you see?
Some might see a man in tan chaps and a leather vest clinging to the back of an enraged bull at a rodeo. Others might see a clean shaven man in jeans, a starched cotton shirt, and cowboy hat doing a line dance at a rustic, local bar. Still others might visualize a dusty man on his horse surrounded by slowly moving cattle in the punishing heat of the Southwestern sun. However, when I imagine a cowboy, the first image that comes to mind is a tired, dusty man, sitting on a rolled up blanket by a crackling campfire, his horse tied up nearby, and he enjoying the peaceful stillness of the dark open plains.
"As the moon rises he sits by his fire, thinking about women and glasses of beer. Closing his eyes as the doggies retire, he sings out a song, which is soft, but it's clear, as if maybe someone could hear. Goodnight you moonlight ladies. Rockabye Sweet Baby James. Deep greens and blues are the colors I choose. Won't you let me go down in my dreams, and rockabye Sweet Baby James."
~James Taylor
With this vision of a cowboy on my mind, I knew that my son's Sweet Baby James Cowboy Party would not be complete without a campfire.
Since I was already working with paper mache for the Cardboard Western Town, I decided to make the campfire from the same material. As I mentioned in a previous post, I normally use torn-up, used printer paper and a 1 part Elmers White Glue and 2 parts water solution to do paper mache, because these are the materials readily available in my home.
1. After you have torn your paper into small strips and mixed up your glue-water solution, blow up approximately 12 balloons. Paper mache over them and allow to dry.
2. Paper mache a second layer onto your balloons. Let dry.
3. Once the paper mache is completely dry, pop the balloons and remove from them from inside the paper mache. Crumple the dry paper mache spheres into a rock like shape.
4. Cut out a large circle from a piece of cardboard. Mine was approximately 30 inches in diameter.
5. Place your paper mache rocks along the edge of the cardboard to form the outer ring of your campfire. My "rocks" stuck out over the edge of the cardboard circle by about an inch. Tape or hot glue the paper mache rocks in place and then paper mache over any exposed tape or glue.
6. Once everything is dry, paint the rocks and campfire base gray using an acrylic craft paint. If you have time (I did not, but wish I did) sponge on a second, darker color of gray on the rocks to give them a more realistic look.
7. To make the logs for the campfire, stuff paper towel tubes with crumpled newspaper or printer paper. Use masking tape to tape over the ends and hold in the crumpled paper. Then, paper mache over the masking tape and the length of the paper towel tube.
8. Stack the paper mache logs in the center of the paper mache campfire in the same manner that you would stack logs in a real campfire. Tape or hot glue the logs in place and paper mache over any exposed tape or glue. Paint the paper mache logs brown using an acrylic craft paint.
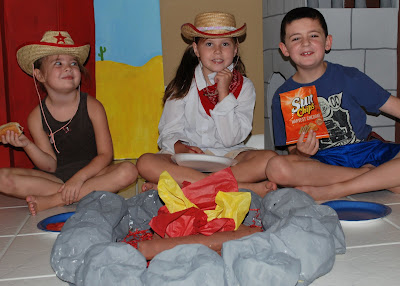
9. Scatter red paper shreds around the bottom of the campfire to mimic hot embers and use red, yellow, and orange tissue paper to create flames.
You're done and ready to roast some imaginary marshmallows!
The kids at James' party loved eating their lunch around the campfire!
Happy Crafting!


Thank you for sharing :) I'm going to try and recreate but on a smaller scale for our Cub Scout Blue and Gold Banquet.
ReplyDeleteThis is such an imaginative and creative way to build a campfire.
ReplyDelete