For the crafty person, a fabric store can be a very spooky place. You walk resolutely through its doors determined that this time you will come out with that spool of thread you need and only that spool of thread. You grab the little basket by the door, stare straight ahead, and walk quickly toward the thread aisle. Then, it happens. Out of the corner of your eye you spot a beautiful piece of velvet and begin to drift toward it. You fall under the spell of the fabric aisle, and the next thing you know, you are pushing around a cart overflowing with bolts of jersey, bundles of fleece remnants, and yards upon yards of colorful felt. And, that, my friends, is what happened to me this weekend.
I was in the fabric store gathering up sprinkles and frosting for a pumpkin cookie decorating activity at my church. While I was scouring the store for every bit of sugar in orange, green, and white, I spotted it: a gorgeous bolt of orange burlap. And, it was on sale! How could I possibly pass this up? But, what would I do with it?
I decided then and there that I just had to sew something for my husband and myself that would go with my son's Simple Sandwich Costume. I wouldn't just dress my son up this year. I was going to dress the whole family up in a theme. Never mind that it was Friday afternoon and I only had a few hours until the Halloween Party at our local YMCA. Everyone. Would. Have. A. Costume.
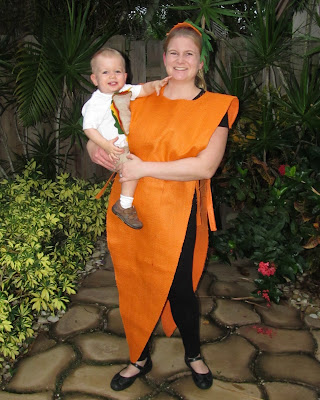
I decided that we were going to be "A Healthy Lunch." James, of course, was of a sandwich, my husband was 2% milk, and I was a carrot. The costumes were quick, simple, and done just in time. Here's how they were made:
The 2% Milk Costume:
1. Cut out a 6 inch by 9 inch rectangle from white felt.
2. Cut the letters out of black felt. You can find the pattern for the letters here.
3. Pin the letters to the 6x9 rectangle.
4. Sew down the middle of the letters to attach them to the rectangle.
5. Pin the rectangle to the front of a white T-shirt.
6. Sew the rectangle to the T-shirt, making sure not to sew the front and back of the T-shirt together (Yes, this has happened to me before).
7. Put on your 2% Milk T-shirt and pick up an adorable sandwich!
The Carrot Costume:
1. Get 3 yards of orange felt and 3 yards of orange burlap.
2. Using spray adhesive, glue the burlap and felt together. Here's a tip for doing this. Spread out the felt on the ground. Roll up the burlap. Spray a section at the top edge of the felt with the spay adhesive and press the edge of the burlap onto this section. Continue to spray the felt with adhesive one horizontal section at a time. Roll the burlap down onto it until the entire length of burlap is adhered to the felt.
3. If one piece of fabric is wider than the other, cut off the excess.
4. Measure the width of your shoulders and add an inch. This will be the width of your carrot.
5. Fold the fabric in half (horizontally or "hamburger" way) with the burlap facing inward. Using a disappearing ink pen or chalk pencil, draw a carrot shape with a neck hole on the fabric.
6. Cut out the carrot shape and the neck hole. Be careful when cutting out the neck hole because you will be using the oval scrap that results from this to make a head piece.
7. To help prevent fraying, sew around the entire carrot and the neck hole 1/4 inch from the edge.
8. Using some of the left over fabric, cut four 1 inch by 18 inch strips.
9. Pin the strips to the carrot 15 inches down from the fold and approximately one inch in from the edge. Sew in place.
To make the carrot head piece:
1. Take the oval shape left over from cutting out the neck hole and cut a small circle in its center.
2. To prevent fraying, sew around the edges 1/4 inch in.
3. Cut out six carrot greens from felt using the pattern found here.
4. Fold each carrot green over and hand stitch to make a loop around a green hair tie.
5. Put your hair up in a very high ponytail using another green hair tie. Thread the pony tail through the head piece and bobby pin the head piece to your hair. Loop the carrot greens' hair tie around your pony tail and bring the carrot greens to one side of your head.
You're done! Now, go grab a sandwich.
Just in case you missed those links to the patterns, here they are again:
2% Milk Letters
Carrot Greens
Happy Crafting!


No comments:
Post a Comment