Monday, October 17, 2011

Crafting a Cowboy Party: Paper Mache Campfire

Close your eyes and visualize a cowboy. What do you see?

Some might see a man in tan chaps and a leather vest clinging to the back of an enraged bull at a rodeo. Others might see a clean shaven man in jeans, a starched cotton shirt, and cowboy hat doing a line dance at a rustic, local bar. Still others might visualize a dusty man on his horse surrounded by slowly moving cattle in the punishing heat of the Southwestern sun. However, when I imagine a cowboy, the first image that comes to mind is a tired, dusty man, sitting on a rolled up blanket by a crackling campfire, his horse tied up nearby, and he enjoying the peaceful stillness of the dark open plains.

"As the moon rises he sits by his fire, thinking about women and glasses of beer. Closing his eyes as the doggies retire, he sings out a song, which is soft, but it's clear, as if maybe someone could hear. Goodnight you moonlight ladies. Rockabye Sweet Baby James. Deep greens and blues are the colors I choose. Won't you let me go down in my dreams, and rockabye Sweet Baby James."
~James Taylor

With this vision of a cowboy on my mind, I knew that my son's Sweet Baby James Cowboy Party would not be complete without a campfire.


Since I was already working with paper mache for the Cardboard Western Town, I decided to make the campfire from the same material. As I mentioned in a previous post, I normally use torn-up, used printer paper and a 1 part Elmers White Glue and 2 parts water solution to do paper mache, because these are the materials readily available in my home.

1. After you have torn your paper into small strips and mixed up your glue-water solution, blow up approximately 12 balloons. Paper mache over them and allow to dry.


2. Paper mache a second layer onto your balloons. Let dry.

3. Once the paper mache is completely dry, pop the balloons and remove from them from inside the paper mache. Crumple the dry paper mache spheres into a rock like shape.

4. Cut out a large circle from a piece of cardboard. Mine was approximately 30 inches in diameter.

5. Place your paper mache rocks along the edge of the cardboard to form the outer ring of your campfire. My "rocks" stuck out over the edge of the cardboard circle by about an inch. Tape or hot glue the paper mache rocks in place and then paper mache over any exposed tape or glue.

6. Once everything is dry, paint the rocks and campfire base gray using an acrylic craft paint. If you have time (I did not, but wish I did) sponge on a second, darker color of gray on the rocks to give them a more realistic look.

7. To make the logs for the campfire, stuff paper towel tubes with crumpled newspaper or printer paper. Use masking tape to tape over the ends and hold in the crumpled paper. Then, paper mache over the masking tape and the length of the paper towel tube.

8. Stack the paper mache logs in the center of the paper mache campfire in the same manner that you would stack logs in a real campfire. Tape or hot glue the logs in place and paper mache over any exposed tape or glue. Paint the paper mache logs brown using an acrylic craft paint.

9. Scatter red paper shreds around the bottom of the campfire to mimic hot embers and use red, yellow, and orange tissue paper to create flames.

You're done and ready to roast some imaginary marshmallows!

The kids at James' party loved eating their lunch around the campfire!


Happy Crafting!

Friday, October 7, 2011

Crafting a Cowboy Party: Birthday Banner

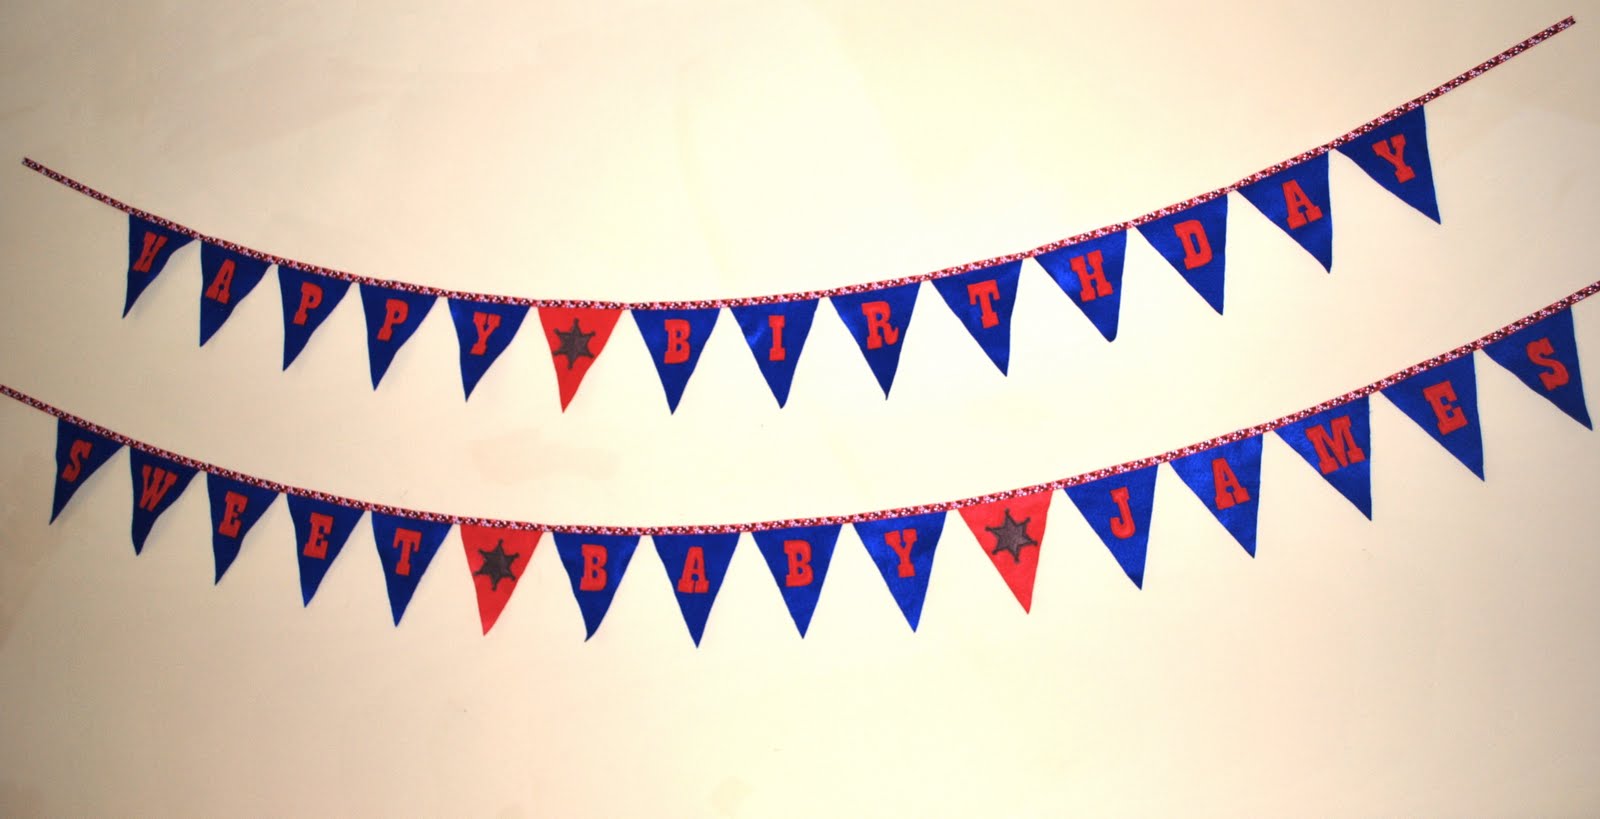
I decided pretty early on that James just had to have a home made birthday banner for his Sweet Baby James Cowboy Party. After all, without a banner how could anyone possibly know that it was his birthday? There were only the balloons, the cake, the outfit...but, that's beside the point. Birthday banners are classic and iconic and James was going to have one.


After looking at a few pictures online, I decided on this method for making the banner:

1. Create a pattern for the pennants, letters, and star embellishment on Photoshop Elements. You can find the pattern here.

2. Cut everything out of felt. I made most of the pennants blue and the letters red. However, the pennants that would be the spaces between the words were red with brown sheriff stars, which made for nice contrast, but still fit the overall color scheme.

3. Pin the letters to their individual pennants. I would suggest lining up the pennants, so that you can make sure that the letters will be level when the pennants are eventually attached to the ribbon to make the banner.

4. Sew around the letters using a quarter inch seam allowance.


5. Pin sheriff stars to their individual pennants. Sew around the stars using a quarter inch seam allowance.

6. Choose a ribbon to sew your pennants onto to form your banner. I found a nice half inch wide bandanna print red ribbon in the ribbon aisle of my local fabric store.

7. Lay out your ribbon with the wrong/bad side facing up. Lay your pennants face down (wrong side up) on the ribbon. Match up the top edge of the pennant with the top edge of the ribbon. The top corners of the adjacent pennants should be about 1/8 to 1/4 inch apart. Remember to leave at least 8 inches of ribbon at both ends of the banner for hanging. Pin the pennants to the ribbon.


Note: I decided to divide my pennants into two groups and make two banners, since my message was so long. That way I could hang one above the other. The first read, "Happy Birthday" and the second said, "Sweet Baby James."

8. Sew down the middle of the ribbon to attach the pennants to the ribbon.

9. Hang banner and enjoy!


Just in case you missed the link for the pattern above here it is again:

Cowboy Pennant Banner

Happy Crafting!

Monday, October 3, 2011

Crafting a Cowboy Party: Cardboard Western Town

Because children of all ages were coming to my son's Sweet Baby James Cowboy Party, I had to create activities that had wide appeal. What could I make that a 7 month old, a 9 year old, and children of every age in between would enjoy? Why a kid-size play town of course. Regardless of age, children enjoy climbing through, hiding in, and running around a little town that is just their size.

Since this was a cowboy party, I took my inspiration from the old Western towns, and decided to include a mine, general store, jail, sheriff's station, and "juice saloon."


I started by taping together cardboard boxes with masking tape. A few boxes were from our jogging stroller, but most were just your plain old shipping boxes from Amazon.com. I then cut out doors, windows, and an escape hole in the jail using scissors and an exacto knife.

The first part that I constructed was the Juice Saloon and James loved it from day one!


To add stability and strength to the structure, I paper mached over all of the masking tape and around any cut edges. Traditionally paper mache uses long strips of newspaper and paste, however I seldom have either of those things around my house. So, for this project I used torn up printer paper and a mixture of 1 part Elmers School Glue and 2 parts water. We have A LOT of used printer paper around our house as my husband is still in school.

Most of the town was made using boxes that had been broken down and unfolded. However, in order to create a base for the jail bars, I used two whole Amazon shipping boxes stacked and taped together. I also used a whole box above the jail bars.


The jail bars were made from cardboard paper towel tubes that I paper mached and stuffed with phone book pages. Finally, a good use for the phone books that keep appearing on my doorstep!

After the construction stage was finished, I painted the Western Town using regular old acrylic craft paint. Since it was James' party, I decided that his name needed to be in all of the signs.


The Western Town was a bigger hit with the kids at the party than I ever could have imagined. All of the children played in the town for Three. Solid. Hours. They did not want to stop playing to eat lunch (we did manage to eventually lure them out with promises of eating around the paper mache campfire) and they did not want to go home when the party was over.


However, what really made every second of my hard work worth it was seeing how much fun James had playing in the Western town. He held his own with the older kids, and loved every moment of being bumped, squished, and chased around!


I have one rough-and-tumble little guy!

Happy crafting!

Wednesday, September 28, 2011

Crafting a Cowboy Party: The Perfect Outfit

Having the perfect outfit to wear to a party can make a big difference. Knowing that you look great can give you the boost in confidence needed to meet new people, try new things, and have a fantastic time.

O.k., but how does this apply to a one year old? He has no clue what he's wearing. While that is true, at a birthday party, the birthday boy or girl is the center of attention and therefore the centerpiece of the party. Crafting an outfit for your little one that goes perfectly with your party's theme helps create a festive atmosphere for all of your guests to enjoy. Besides, dressing up your baby is just plain fun!

Since my son's first birthday was going to be a Sweet Baby James Cowboy Party, he obviously needed to be dressed as a cowboy.


I started by sewing a felt cowboy vest.


The pattern for this is the Frontier Vest over at Made. Since the original pattern is sized for 2-4 year olds, I used Photoshop Elements to shrink it down to the same dimensions as one of James' 18 months size sweater vests. I also decided to replace the original red star with a yellow sheriff's star and a number one for a very special one year old.

This vest was actually my very first sewing project on my very first sewing machine. I guess you could say that it is this vest's fault that I am now addicted to sewing.

Next, I decided to make a special cowboy themed birthday shirt.


The yellow and brown elements are made from jersey and the number one is made from green John Deere flannel, strategically cut to avoid all John Deere logos. Everything is attached to a plain white T-shirt using Lite Steam-a-Seam 2 and then hand stitched with white thread. If you would like to make this shirt, you can find the pattern for it here.

I also made a felt cowboy belt with a monogrammed felt belt buckle. Really. What is a cowboy (or cowgirl) without a giant belt buckle?


To make the belt:

1. Gather your supplies: brown felt (the cut by the yard kind, not the little squares from the craft aisle), brown thread & two 1-inch metal D-rings.

2. Cut two 1-inch wide strips of brown felt. The length of these strips should be however long you would like your belt to be plus about one and a quarter inches. The felt strips that I used to make James' belt were 24 inches long.

3. Sew the two strips of felt together to create a belt using a quarter inch seam allowance on all four sides.


4. Thread the belt through both D-rings, fold over by about an inch, and sew down the belt end onto the belt itself to create a loop.


To make the belt buckle:

1. Cut out buckle and buckle strap patterns from light gray felt. Cut out letters from dark gray felt. You can find the pattern for the buckle and letters here.

2. Using fabric glue or hand stitching, attach the letters to the right/good side of one of the felt belt buckle ovals.

3. Sew the buckle straps to the right/good side of the other felt belt buckle oval.


4. Pin the two belt buckle ovals together with the right/good sides facing out. Sew together using a quarter inch seam allowance.

Thread the belt buckle onto the belt and put it on your favorite little cowboy or cowgirl!

The last element of James' outfit was his cowboy hat. I didn't feel up to sewing a hat at that time, so I went ahead and bought one on Amazon. It is a gorgeous hat, very well made, sturdy enough to withstand a toddler, and designed to fit for years. I really can not say enough about how wonderful this hat is, so if you are looking to buy a child size cowboy hat, this is a great one to get.

Just in case you missed any of the links for the patterns, here they are again:

Frontier Vest over at Made

First Birthday Cowboy Shirt

Belt Buckle & Letters

Happy Crafting!

Sunday, September 25, 2011

Sweet Baby James Cowboy Party


Baby names can come from a lot of places. They can be handed down through a family for generations, taken from books and movies, procured from religion, or simply be a name that you adore. Or like my son's name, they can be inspired by a song.

Now I should clarify; James is a family name. For generations, there have been men with this name on both sides of our family tree. It also happens to be my husband's middle name. However, if it had not been for that fateful day when I first heard that one special song, I may never have chosen the name James for my son.

There I was, just starting my second trimester and painting away on the murals that would cover the walls of my precious child's nursery. Never one for working in silence, I decided to play an album that my dad had just given me: "James Taylor's Greatest Hits." I was enjoying the music and let my mind drift as I painted the soft green blades of grass. Then, "Sweet Baby James" came on. Something about that song captured my complete attention from the moment it started. Hearing it stirred something inside of me, and when it came to the line "Rockabye Sweet Baby James," I burst into tears. I knew, just knew, that that the little one I was carrying was my own Sweet Baby James. I softly rubbed my belly and quietly whispered, "I love you, James." From that moment on, I wouldn't even consider another name. My baby was James.

Now is it any surprise that such a significant moment would be an inspiration for craftiness? I think not. The song that inspired James' name also inspired the theme of his first birthday party. Just as easily as I decided on his name, I determined that he must have a Sweet Baby James Cowboy Party. And, me being me, nearly everything was handmade.

So how do you craft a Sweet Baby James Cowboy Party?

Start by stitching together the perfect outfit.


Build a western town.


Sew a banner.


Construct a campfire.


Create a cactus and some cows.


Craft some Goodies.


Whip up a cake.


Accessorize with bandanas.


Invite some guests.


Set it all up.


And, celebrate!


James had a blast at his Sweet Baby James Cowboy Party and so did all of his guests!

P.s. The posts that follow this one will contain instructions on how to make each of the items shown above. Links will be added to this post for each item as I go along.